
Knowing how to take off a commercial plumbing job is about doing the hard work upfront, and the shops that skip this step pay for it later.
A plumbing takeoff dictates what gets installed, and a counting mistake here gets multiplied by everything priced on top of it. A floor drain missed on page 14 of a 40-sheet plumbing set creates avoidable costs with every foot of pipe, every fitting, and every labor hour tied to that fixture's rough-in. The worst part: None of it surfaces until the change order gets disputed.
This guide walks through the 10-step process commercial estimators use to move from a bid package to a quantity list they can defend. Plus, we'll show how to carry accurate quantities into every stage of the plumbing estimate.
What Should Be Included in a Commercial Plumbing Takeoff?
A commercial plumbing takeoff is the complete inventory of what a project requires: every fixture, every material's quantity, pipe size and length, and every fitting, valve, hanger, and piece of equipment on the drawings. Pricing that inventory happens after, and it's a separate step.
That separation matters more on commercial work than on a service call. On a hospital floor plan, one water closet can draw from five different plumbing systems — domestic water, sanitary waste, vent, storm, and sometimes gas — each on its own sheet. Getting the fixture count right isn't enough; if you miss the connection on the isometric, the quantities won't add up.
A complete commercial plumbing material takeoff accounts for:
- Domestic water (hot, cold, and recirculated)
- Sanitary waste and vent
- Storm drainage
- Natural or medical gas, and other specialty systems where the project calls for them
- Fixtures, equipment, and trim as called out in the fixture schedule
- Fittings, valves, and connections tied to every run
- Hangers, supports, sleeves, and insulation
- Documented waste factors and assumptions for anything the drawings don't resolve
Skip any of these categories, and the gap lasts throughout the process. Failing to count a fixture also means you don't include its pipe, fittings, and labor hours in the estimate.
The 10-Step Commercial Plumbing Takeoff Process
Here's the plumbing takeoff process, step by step, in the order commercial sets are organized, from reviewing the full bid package to a final check before pricing begins.
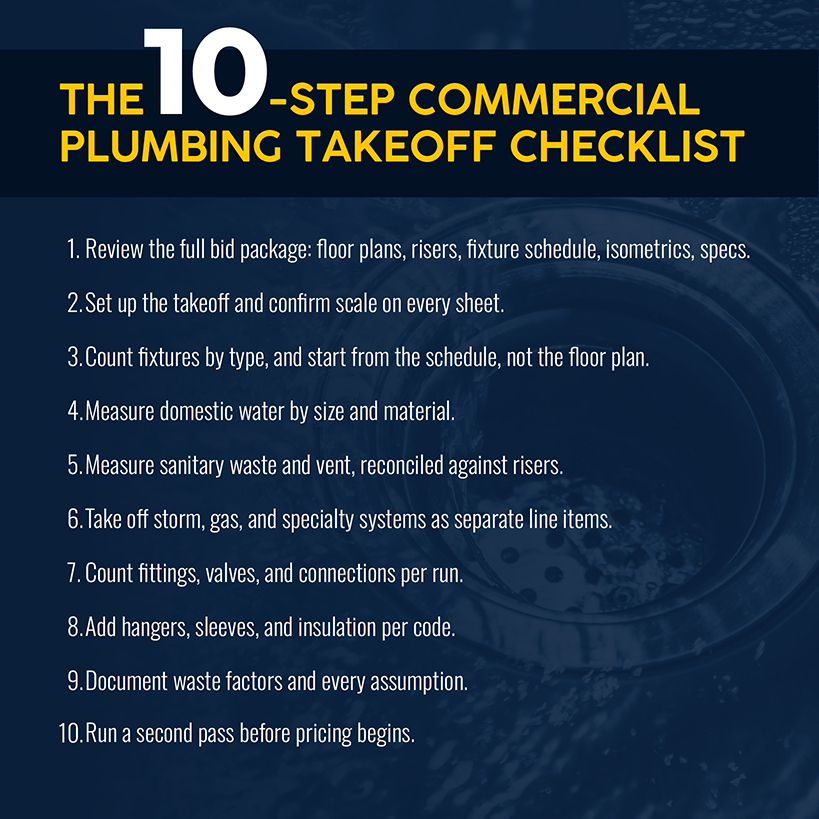
1. Review the Complete Bid Package Before Doing Anything Else
Before tracing a single pipe run, read the entire bid package from cover to cover. Commercial sets generally follow a predictable order: cover sheet and legend, underground and slab plumbing, above-ground water and sanitary, storm and vent, riser diagrams, fixture schedule, details, and gas plans.
Division 22 specifications (such as 22 05 00 for general, 22 11 00 for domestic water, 22 13 00 for sanitary, 22 40 00 for fixtures, and 22 63 00 for medical gas) set the pipe material, fitting style, plumbing code, insulation, and commissioning scope you'll need before counting a fixture.
Skipping to the floor plans because they're the most familiar sheet increases the risk of scope gaps. The floor plan shows you a fixture symbol, not its requirements. A sensor faucet or a specific flush valve lives in the fixture schedule; a system-level requirement, such as a solar water-heating tie-in, lives in the Division 22 spec. Neither is visible from the plan view, and both are easy to skip.
The operational fix: Build a one-page checklist from the Division 22 spec sections before you open the floor plans (pipe material, fitting style, insulation, and any commissioning requirements) and keep it next to you while you count. Anything on that checklist without a matching quantity by the time you finish the takeoff gets flagged, not assumed.
2. Organize the Drawings and Set Up the Takeoff
After reviewing the documents, set up the takeoff. Confirm scale on every sheet, as a set printed at half size throws off every dimension. Then, build a structure, whether that's using a spreadsheet, plumbing takeoff software, or paper and a highlighter, and create separate sections for domestic water, sanitary and vent, storm, and gas.
Plumbing plans use different line types to separate systems, but the conventions can vary by firm. Read the legend before you trace, as any misreading changes which system a length of pipe belongs to.
The operational fix: If your shop uses prebuilt assemblies for recurring configurations, like a standard restroom core, apply them here rather than rebuilding the count from scratch. This saves you time on every bid that reuses that configuration.
Related: Evaluating your software stack? Our comparison of the best plumbing job management software shows the differences between a single-purpose takeoff tool and a fully operational platform.
3. Count Fixtures and Major Plumbing Equipment
Plumbing contractors should start with the fixture schedule, not the floor plan. Identify every fixture tag (typically, WC for water closet, UR for urinal, LAV for lavatory, SK for sink, FD for floor drain, and so on), then count every instance by room across the floor set before moving to the next fixture type. Color-code as you go.
While you should count each particular fixture room by room, resist the temptation to count all fixtures room by room. Counting one fixture type at a time prevents double-counting and keeps your fixture counts accurate across floors.
Consider a plumbing project at a 60,000-square-foot medical office building with a bid worth roughly $650,000 in plumbing scope. Counting fixtures will typically take a two-person estimating team the better part of a day. They'll cross-check every fixture against the architectural plans. If a room shows a sink on one sheet and nothing on the other, they'll create a request for information (RFI) rather than guess.
The operational fix: After you finish counting fixture-schedule items, run a second pass through the mechanical and site plans specifically for roof drains, area drains, and hub drains. They won't show up if you only work the fixture schedule top to bottom. Log each one with the same tag discipline (RD, AD, HD) you used for everything else, so nothing gets counted as "miscellaneous" or skipped entirely.
Related: Once your quantities are locked, our plumbing bid template gives you the formal proposal structure commercial clients and general contractors expect.
4. Measure Domestic Water Systems
Trace domestic water piping (hot, cold, and recirculated) by linear foot and diameter. Break out pipe lengths by run rather than lumping them into a total. The International Plumbing Code (IPC) defines pipe length as measured along the pipe and fitting centerline, and applying that inconsistently is a common source of footage errors.
Also, make sure to separate by material. Copper, cross-linked polyethylene (PEX), and chlorinated polyvinyl chloride each carry different labor factors and current costs, so blending them into a generic pipe count creates a pricing problem before the estimate begins.
Copper has been trading at record highs, compounded by a 50% Section 232 tariff on imported semi-finished copper products, including pipe and fittings. A takeoff priced against last quarter's copper numbers can significantly misprice a domestic water system.
The operational fix: Measure every run to the same IPC-defined centerline standard, and keep a running tally by material as you go rather than reconciling it at the end. Before pricing, pull the current copper cost against your material list so the volatility shows up in the estimate rather than in a change order.
5. Measure Sanitary Waste and Vent Systems
Measure sanitary waste and vent piping the same way, tracing runs by size and material and keeping them in their own section rather than folding them into the domestic water count. Waste and vent share fixture connections but run on different slopes, code requirements, and often different materials. Blending them into a generic pipe total makes the estimate harder to confirm.
The operational fix: Reconcile every riser connection against the floor plans, floor by floor, to ensure nothing is measured twice or missed at floor transitions. Estimators face understandable deadline pressure, but skipping the reconciliation pass is a good way to introduce errors.
6. Take Off Storm, Gas, and Specialty Systems Separately
Storm drainage and gas piping also get separate treatment. On a project with roof drains, area drains, and a storm system tied into site work, keep that scope distinct from sanitary waste, even where the pipe material overlaps.
Gas piping, whether it serves kitchen equipment, a boiler room, or a rooftop unit, carries its own sizing rules and shouldn't borrow quantities from a similar job.
Specialty systems, including medical gas, compressed air, solar water-heating tie-ins, and sensor faucet-control wiring, are prone to scope gaps that lead to change orders. These items require checking supplier documentation before the bid goes out.
The operational fix: Build a specialty-systems checklist from the specification section during step one. Confirm every item has a corresponding quantity before the takeoff moves to pricing. Catching a missing medical gas tie-in at takeoff takes 20 minutes. Catching it after award results in a change-order dispute and can harm the general contractor's trust in you.
7. Count Fittings, Valves, and Connections
Every pipe run generates fittings, valves, and connections that need their own count, as well as verification that they're sized and typed to match the pipe they serve. This is where labor estimating standards matter most.
The Mechanical Contractors Association of America's Web-Based Labor Estimating Manual is the industry-standard reference for labor hours across piping systems, fixtures, hook-ups, and hangers. It supports two approaches:
- The Component Method, which bundles all labor for a single item — a valve, fitting, flange, or pipe segment — into one unit covering handling, joining, and testing
- The Work Activity Method, which breaks labor down by discrete task to separate fabrication from field labor
Neither method replaces an accurate fitting count, and both depend on it.
The operational fix: Count fittings from the isometrics rather than estimating a percentage of linear footage because the labor units are assigned per fitting and per joint, not per foot of pipe. Accurate labor costs depend on every elbow, tee, reducer, and joint getting its own tally, tied to the pipe run it belongs to. Pick one method (Component or Work Activity) for the job and apply it consistently across every system, rather than switching methods between domestic water and sanitary.
8. Include Supports, Sleeves, Insulation, and Indirect Materials
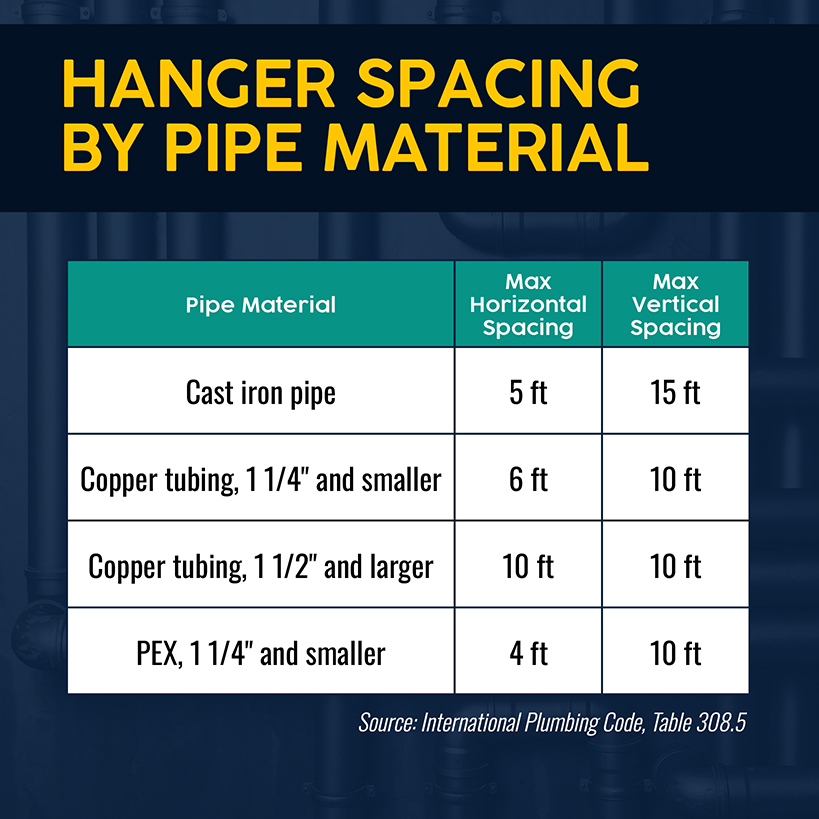
Hangers, supports, sleeves, and insulation get their own line item, governed by code rather than judgment. The IPC's Table 308.5 sets maximum hanger spacing by material:
- Cast iron: maximum of every 5 feet horizontally and 15 feet vertically
- Copper tubing (1.25 inches or smaller): every 6 feet horizontally and 10 feet vertically
- PEX (1.25 inches or smaller): every 4 feet horizontally and 10 feet vertically
Because hanger count is a direct function of linear footage and material, calculate it from steps 4–6 of pipe takeoff rather than estimating it separately. A takeoff that measures 400 feet of 1.25-inch copper tubing and adds "some hangers" is guessing at a number the code already answers.
Insulation follows the same logic: Measure it against the linear footage that requires it, not as a percentage tacked on afterward.
The operational fix: On a large set, it's easy to lose track of sleeves at wall and floor penetrations. Note each one where a pipe run crosses a fire-rated assembly, since that's also where a missed sleeve becomes a missed inspection detail.
9. Add Waste Factors and Document Every Assumption
Every takeoff involves judgment calls that need to be documented. Waste factors for cut pipe, fitting allowances, and any quantity that's estimated rather than measured directly all belong in a documented assumptions list that's attached to the takeoff.
This step matters most for renovation and tenant improvement work, where job site conditions are difficult to verify before demolition begins.
Consider an 8,000-square-foot restaurant tenant improvement bid worth around $140,000 where the existing waste line sits behind a wall that won't come down until the permit is pulled. A documented assumption — a 4-inch cast iron waste line that's assumed to be serviceable but awaiting field verification — protects the bid if that line needs replacement.
Contingency generally tracks project maturity: 3–5% at a well-defined bid stage, rising to 10 to 20% on renovation or retrofit rough-in.
The operational fix: Write down the reasoning behind every number. A reviewer, a general contractor, or your own team might need to see why, often weeks or months later.
10. Check the Takeoff Before Applying Prices
Before any price touches the takeoff, run a second pass that looks for three things:
- Fixtures counted twice across overlapping sheets
- Riser connections that don't match the floor plan
- Specification items flagged in step one that were never quantified
On a 120-unit multifamily project with four plumbing risers serving stacked units and a plumbing scope north of $1.2 million, this second pass typically falls to a second estimator. A fresh set of eyes can catch more than the original estimator reviewing their own work. Only after this check is complete should the quantity list move to pricing.
The operational fix: Require sign-off from the second estimator — name and date, not just a verbal "looks good" — before the quantity list is released for pricing. Make it a checklist against the three items above rather than a general read-through, so the review is auditable if a dispute comes up months later.
Related: Learn how to use AI for plumbing estimating, including when AI shines and when a human needs to check the count.
Turn the Takeoff Into an Estimate That Protects Your Margin
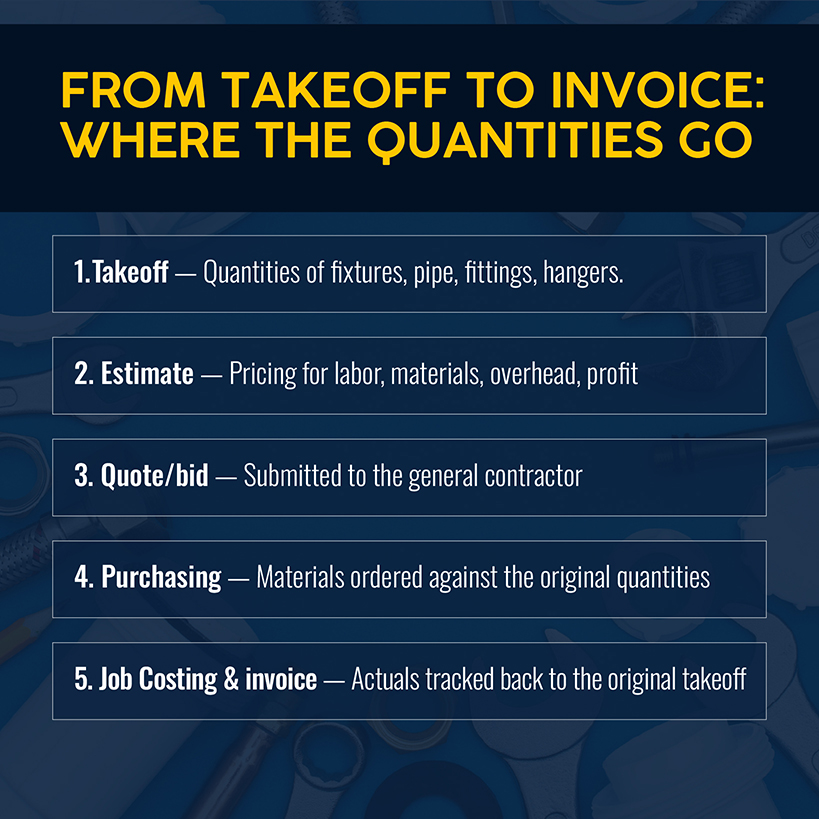
The terms "takeoff" and "estimate" are sometimes used interchangeably, but they rely on different inputs. A takeoff tells you what the project requires, and in what quantities. An estimate turns that requirement into a number while layering labor rates, material pricing, productivity assumptions, overhead, and profit. Additionally, overhead deserves its own line item, calculated against the actual crew time required for the job rather than a flat percentage pulled from last year's numbers.
Plumbing margins are thin, so the takeoff needs to be taken seriously. A quantity error that adds even a few percentage points of unplanned cost can erase your profit before the crew gets to the jobsite.
The quantities built during the takeoff remain important even after submitting the bid. If you win the job, that bill of materials needs to flow into purchasing and job costing without requiring reentry into a different software system — every re-key creates the risk of errors that the takeoff was built to prevent.
Simpro® is plumbing estimating software that lets estimators develop prebuilds and templates that carry catalog items, labor rates, and current supplier pricing straight from the takeoff into the quote, so the numbers that win the bid are the numbers purchasing uses.
Overall, businesses using Simpro report building cost estimates up to 10x faster than manual methods, while Heron Plumbing tripled its turnover without adding office staff.
Related: Our plumbing inventory management best practices guide shows how to keep materials lists accurate during the handoff from office to truck.
Build Every Plumbing Bid on Quantities You Can Defend
Top-tier commercial plumbing shops treat the takeoff as foundational, not a box to check before pricing. The 10 steps above won't make the takeoff go faster, but they should make you more confident that the number you submit will withstand the general contractor's scrutiny.
The harder part is maintaining that discipline across every bid and every estimator, especially as your bidding processes scale beyond what one person can do alone. That's the operational problem Simpro solves: Prebuilds and takeoff templates standardize your estimation processes. Catalog pricing stays current against material volatility. And the software draws a straight line from quoted quantities to the invoice that closes the job.
Schedule a demo to see how Simpro handles takeoffs, estimating, and job costing for your plumbing operation.
Frequently Asked Questions
Can you complete a commercial plumbing takeoff using only plumbing plans?
Not reliably. Plumbing plans show fixture locations and pipe routing. But you need riser diagrams to confirm how systems stack vertically, fixture schedules to define each tag, and specifications for the pipe material, code jurisdiction, and any items not shown on the floor plan, such as a sensor faucet or a solar tie-in. Relying on plumbing plans alone is how specialty items and code-driven requirements like hanger spacing get missed.
How should alternates be handled in a plumbing takeoff?
Keep alternates as separate, clearly labeled line items rather than blending them into the base bid quantities. If a project includes an alternate for upgraded fixtures, a different pipe material, or an added specialty system, take off that scope separately and price it separately. That way, the general contractor can accept or decline without having to rebuild the base estimate. Also, note which drawings and specification sections apply to each alternate, since alternates are often revised in an addendum.
How detailed should a takeoff be before requesting supplier pricing?
The takeoff should have enough detail that a supplier pricing your pipes, fittings, and valves can quote exact material, size, and quantity rather than a rough number. That means pipe is broken out by material and diameter, fixtures are specified to the model where the schedule provides one, and fittings and valves are counted rather than assumed as a percentage of pipe footage. Pricing too early usually means a second round of quotes once real quantities are known.


 Back to top